HCS Documentation
Step 1: TTLock App Setup (Crucial)
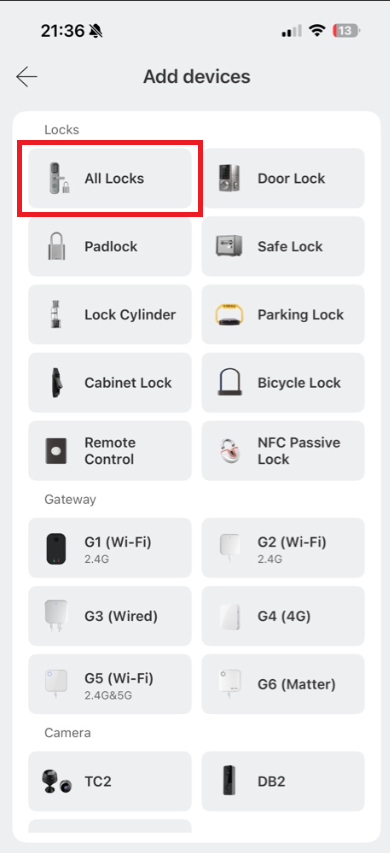
Before using the Hotel Card System, all physical locks must be paired via Bluetooth using the official mobile application.
- Download the free TTLock app from the App Store or Google Play.
-
Create a main administrator account in the app.
Important: Please remember your exact login credentials (email/phone and password), as you will need them in Step 3 for cloud integration!
- Stand directly next to your door lock, turn on Bluetooth, and pair the device to your account.
Step 2: HCS Registration
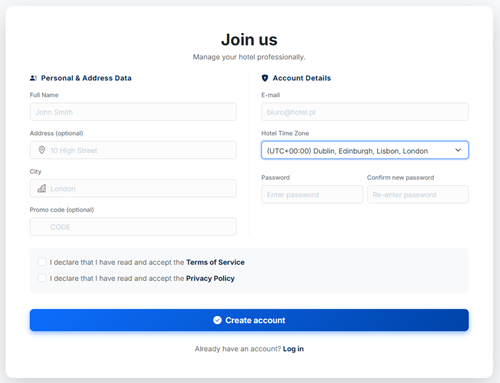
Once your locks are paired in the TTLock app, it's time to create your main administrative account in the Hotel Card System.
- Click the golden Create Account button at the top of the page.
- Fill in your basic information under Personal & Address Data.
- Under Account Details, provide a valid E-mail address (this will be your system login) and set a secure password.
- Crucial Setting - Hotel Time Zone: Make sure to select the correct time zone for your property from the dropdown list. This ensures that all time-limited PIN codes and eKeys generated for your guests will activate and expire at the exact local time.
- Accept the Terms of Service and Privacy Policy, then click the blue Create account button.
Step 3: Cloud Integration
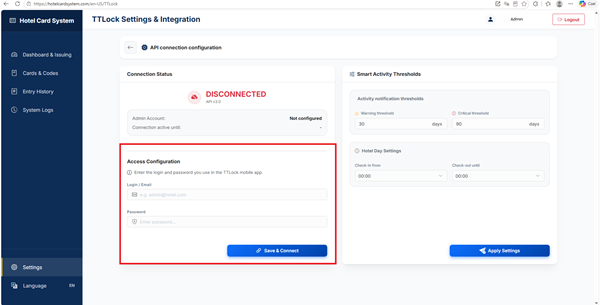
Connect your HCS account with the TTLock cloud to automatically import all your paired locks.
- In the main left navigation menu, click on Settings at the bottom.
- Select the TTLock Settings and integration tile from the system settings dashboard.
- Look at the Access Configuration section on the left side.
- Enter the exact Login/Email and Password that you used in the TTLock mobile app (the ones you saved in Step 1).
- Click the blue Save and connect button. The status above should change from "DISCONNECTED" to CONNECTED.
Step 4: Building Zones
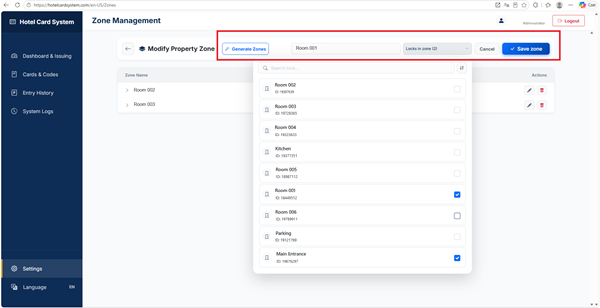
Zones allow you to group multiple locks together (e.g., "Room 101" + "Main Entrance"). This enables your reception desk to issue access to all necessary doors with a single click.
- Go to Settings and click on the Access Zones tile.
- Method 1: Manual Creation (Recommended)
Type a zone name in the text field (e.g., "Apartment 101"), open the Locks in zone dropdown to select the corresponding locks using checkboxes, and click the blue Save zone button. - Method 2: Automatic Generation
If you have a large number of locks, click the Generate Zones button. The system will automatically create one zone for each lock using its original name. - You can always edit any zone later by clicking the pencil icon next to it in the list to add or remove locks.
Step 5: Issue Your First Access
Your system is fully configured! Let's issue your first guest access to see how fast and simple it is.
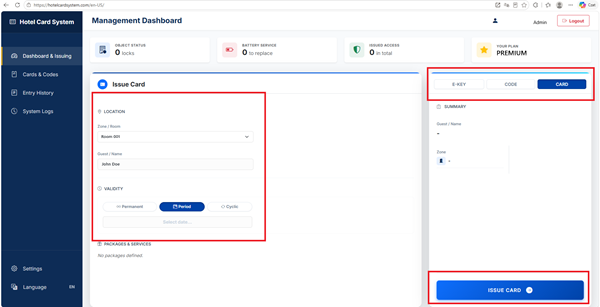
- Go to the main Dashboard & Issuing screen from the left menu.
- In the issuing panel, select your newly created Zone / Room from the dropdown list.
- Enter the Guest / Name (optional, but helpful for history logs).
- Under Validity, click Period and select the check-in and check-out dates.
- Choose your desired access method at the top right (E-KEY, CODE, or CARD) and click the large blue button at the bottom to generate the access.
Note: If you are issuing a CARD, a prompt will appear asking you to place the card on the reader. You will then see the encoding progress for each individual lock within that zone in the right panel, just above the blue button.
Knowledge Base
Dashboard Overview
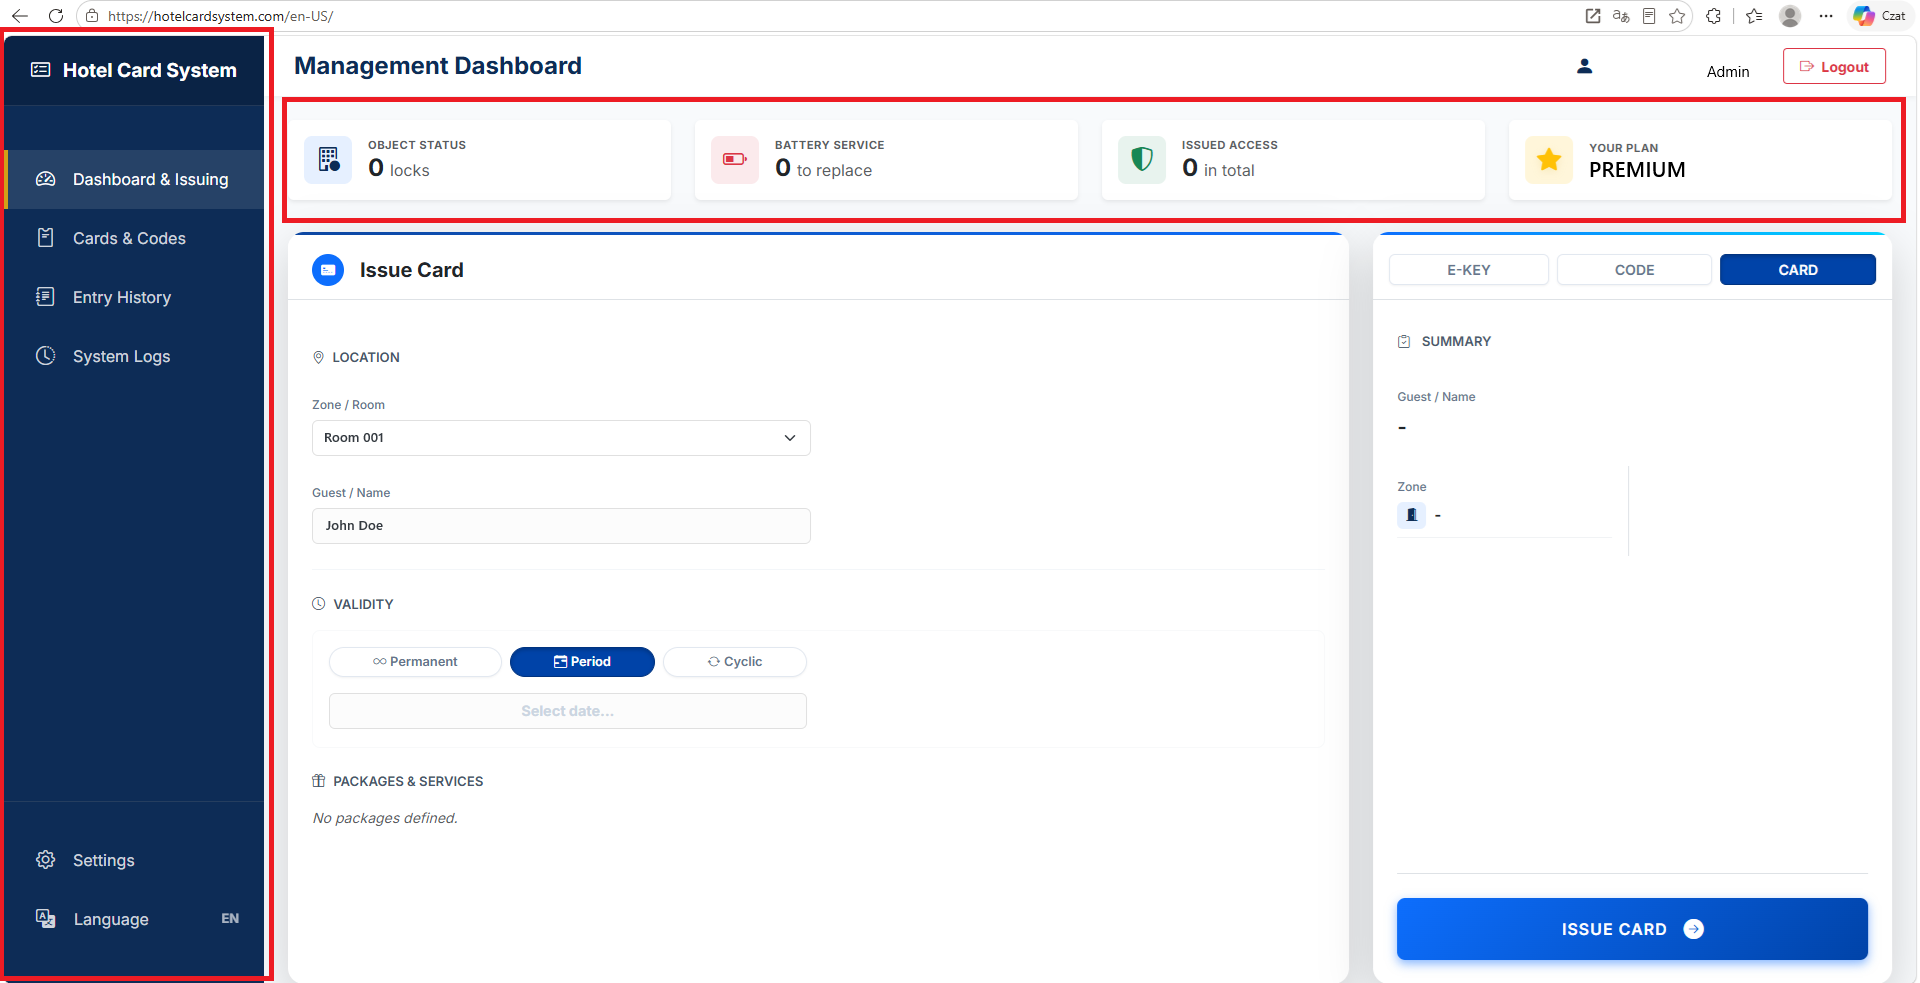
The Management Dashboard is your central hub. It provides quick access to all modules and a snapshot of your system's current status.
Main Navigation (Left Menu)
The left sidebar is your primary navigation tool. Here is what you can find:
Dashboard & Issuing
The main screen where you can quickly issue new access (Cards, Codes, E-Keys) to your guests.
Cards & Codes
Your access registry. View, filter, and manage all active and expired accesses.
Entry History
A detailed log of all door openings, showing who entered, when, and using which method.
System Logs
A detailed record of staff activities, tracking actions such as system logins, and the issuing or revoking of accesses.
Top Statistic Tiles
At the top of the dashboard, you will find quick-glance tiles summarizing key metrics:
- Object Status: Displays the total number of connected locks in your system.
- Battery Service: Alerts you if any locks have low battery levels requiring replacement. Clicking this tile takes you directly to Lock Management.
- Issued Access: Shows the total number of accesses granted, including a breakdown of expired ones.
- Your Plan: Displays your current billing status (e.g., PREMIUM or UNPAID) and provides a shortcut to subscription settings.
Click the image to enlarge
Issuing Access (Cards, Codes, E-Keys)
The main form where you configure and grant new access to your guests.
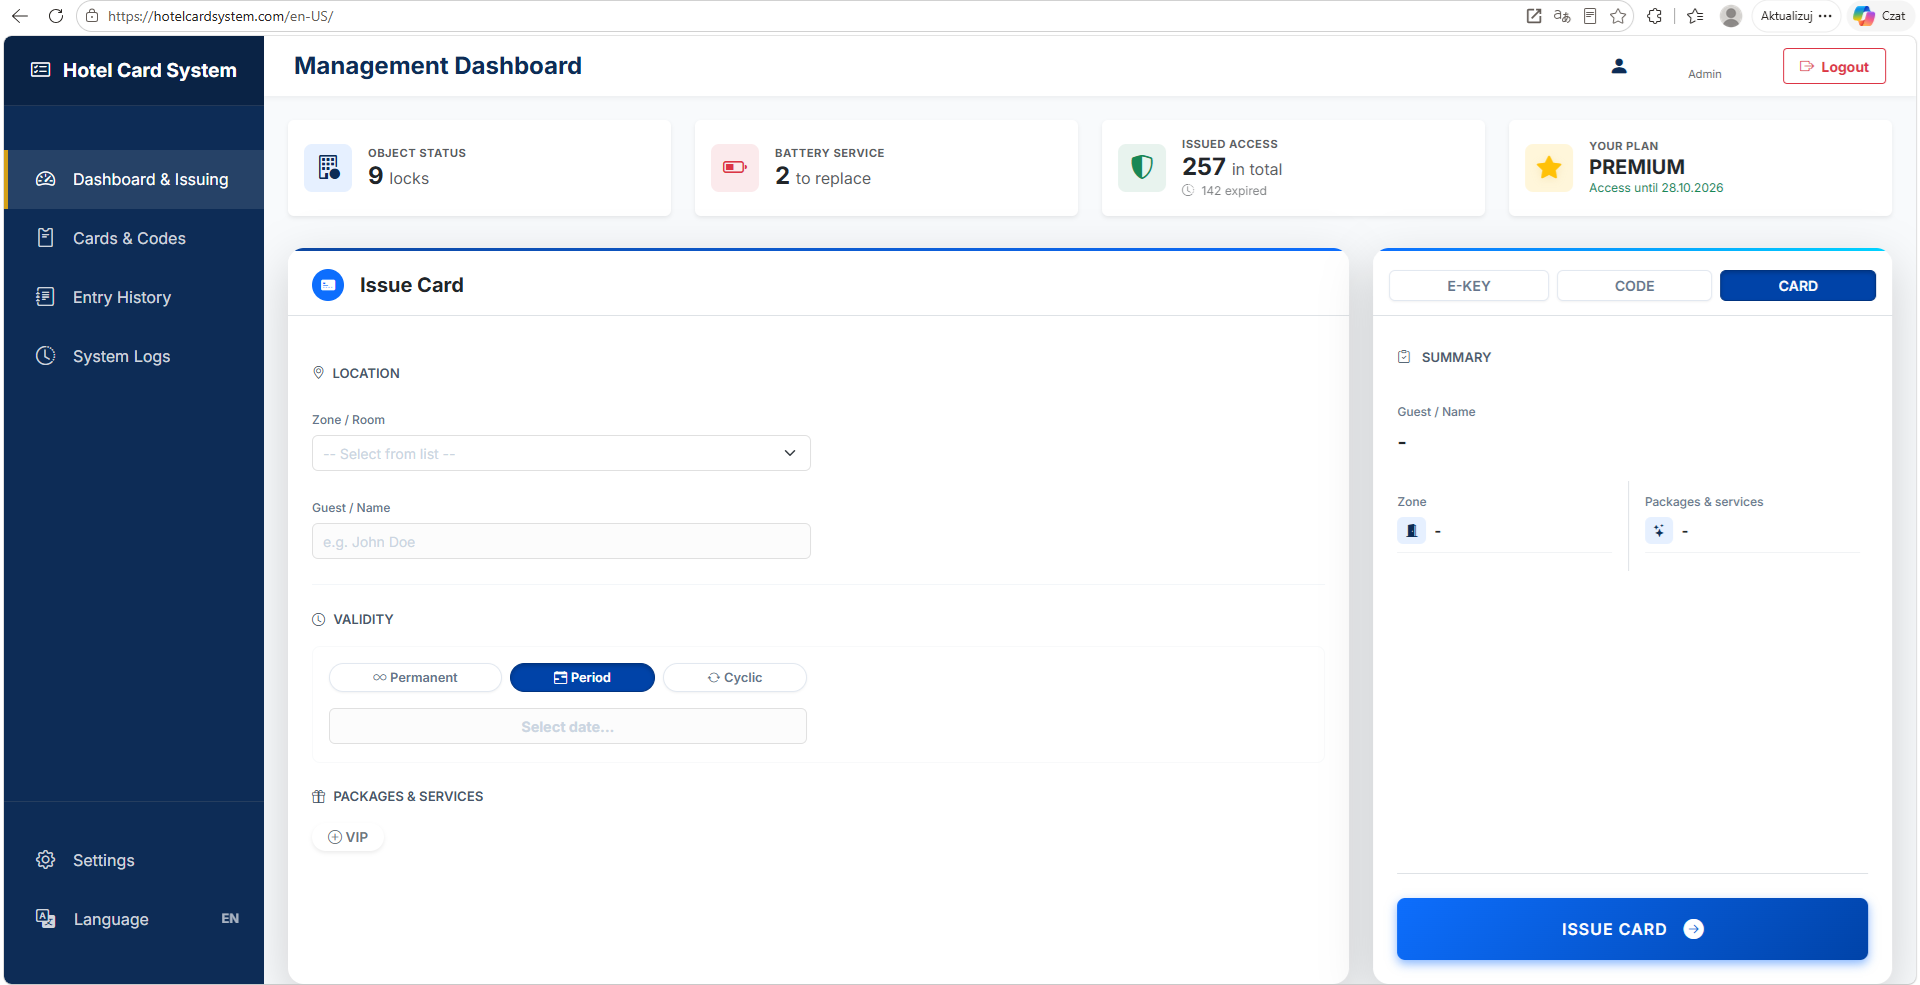
Issuing form and summary block step by step
The process of issuing access consists of a few simple steps:
- Selecting access type (Summary Block): In the right panel, select from the tabs whether you want to issue an E-KEY, CODE, or CARD. Depending on the selection, the form on the left will adjust the visible fields (e.g., for E-keys and Codes, an Email field will appear, and for codes, a PIN Code field).
- Location and Guest: Select the Zone / Room from the dropdown list, then enter the guest's name. After selecting a zone, all locks assigned to it will appear in the summary on the right.
- PIN Generation: When issuing codes, you can enter a PIN manually or click the crossed arrows icon to let the system generate it randomly. PINs issued to a zone comprising multiple locks (e.g., a room and the main entrance) are identical for the guest.
- Validity: Determine the access duration by selecting Permanent (constant access), Timed (requires specifying start and end dates in the calendar), or Cyclic (date range further narrowed to specific days of the week and hours).
- Packages and Services: If the hotel has additional packages defined in the settings (e.g., SPA, Gym), they will be displayed here. This allows granting the guest access to paid zones on the same credential.
- Issuing and email notifications: Finally, click the large blue button at the bottom (e.g., SAVE CARD or GENERATE CODE). For cards, a prompt will appear asking you to place the card on the reader. For E-Keys and Codes, the system will automatically send a message to the entered guest email address (you can edit the content of this email in Settings > Email Notifications).
- Encoding verification: While saving access credentials, a green confirmation (success) or a red error message will appear next to each lock in the zone summary. This makes it instantly visible whether the process was successful or if any lock requires a retry (e.g., due to a temporary lack of connection with the gateway).
Click the image to enlarge
Cards & Codes
The Cards & Codes module is your central hub for monitoring and managing all issued credentials. It offers powerful filtering and smart tracking features to keep your system secure.
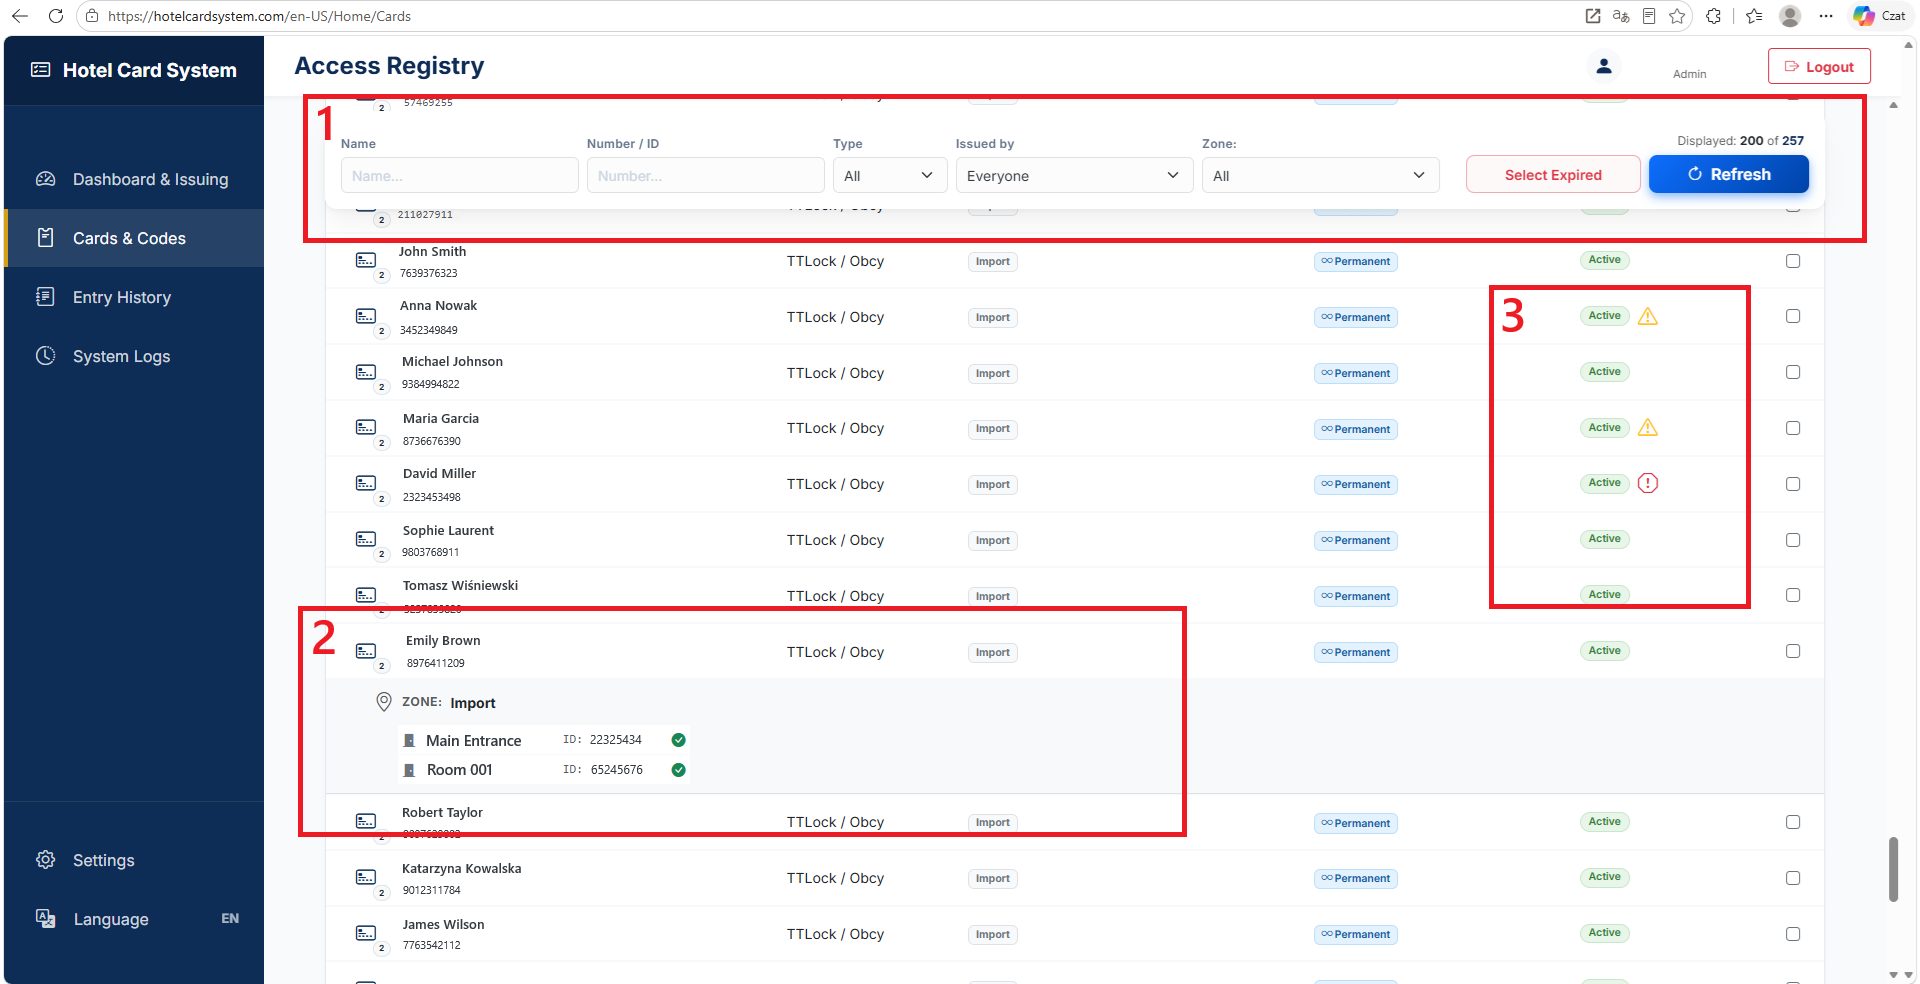
1. Top Navigation & Filters
Use the top bar to quickly locate specific credentials or perform bulk actions:
- Name: Search by the guest's or staff member's name.
- Number / ID: Click this input field and tap a physical card on your desktop reader — the system will automatically read the card number and instantly find it in the registry.
- Type: Filter by access method (PIN, E-Key, or Card).
- Issued by: Filter credentials by the specific staff member who generated them. Select TTLock / External to view accesses issued directly via the TTLock app outside of HCS.
- Zone: Narrow down your search to specific property areas.
- Select Expired: Instantly selects all expired credentials on the list. Once clicked, the button changes to DELETE. Deleting large batches (e.g., hundreds of old codes) will display a progress modal and may take a few minutes to complete safely.
- Refresh: Reloads the current list to show the most recent changes.
2. Detailed Row View & Packages
Clicking on any row expands it to reveal deeper details about that specific credential:
- Assigned Locks: You will see the exact list of individual locks the guest can open.
- Packages: Alongside standard zones, this column displays any extra amenities (e.g., SPA, Pool, VIP Parking) granted to the guest, making it easy to verify Premium access upgrades.
3. Smart Activity Thresholds
To help you maintain security and clean up unreturned or lost cards, the system tracks the usage of permanent and long-term credentials:
- Warning Icons: If a credential hasn't been used for an extended period, a yellow triangle or red exclamation mark will appear next to its status.
- Hover Details: Hovering your mouse over these icons will show exactly how many days have passed since the card was last used, alongside the exact date of its last use.
- Customization: You can define when these warnings appear (e.g., 30 days for a yellow warning, 90 days for a red critical alert) in the main System Settings. This makes identifying and revoking abandoned cards incredibly fast.
Click the image to enlarge
Entry History
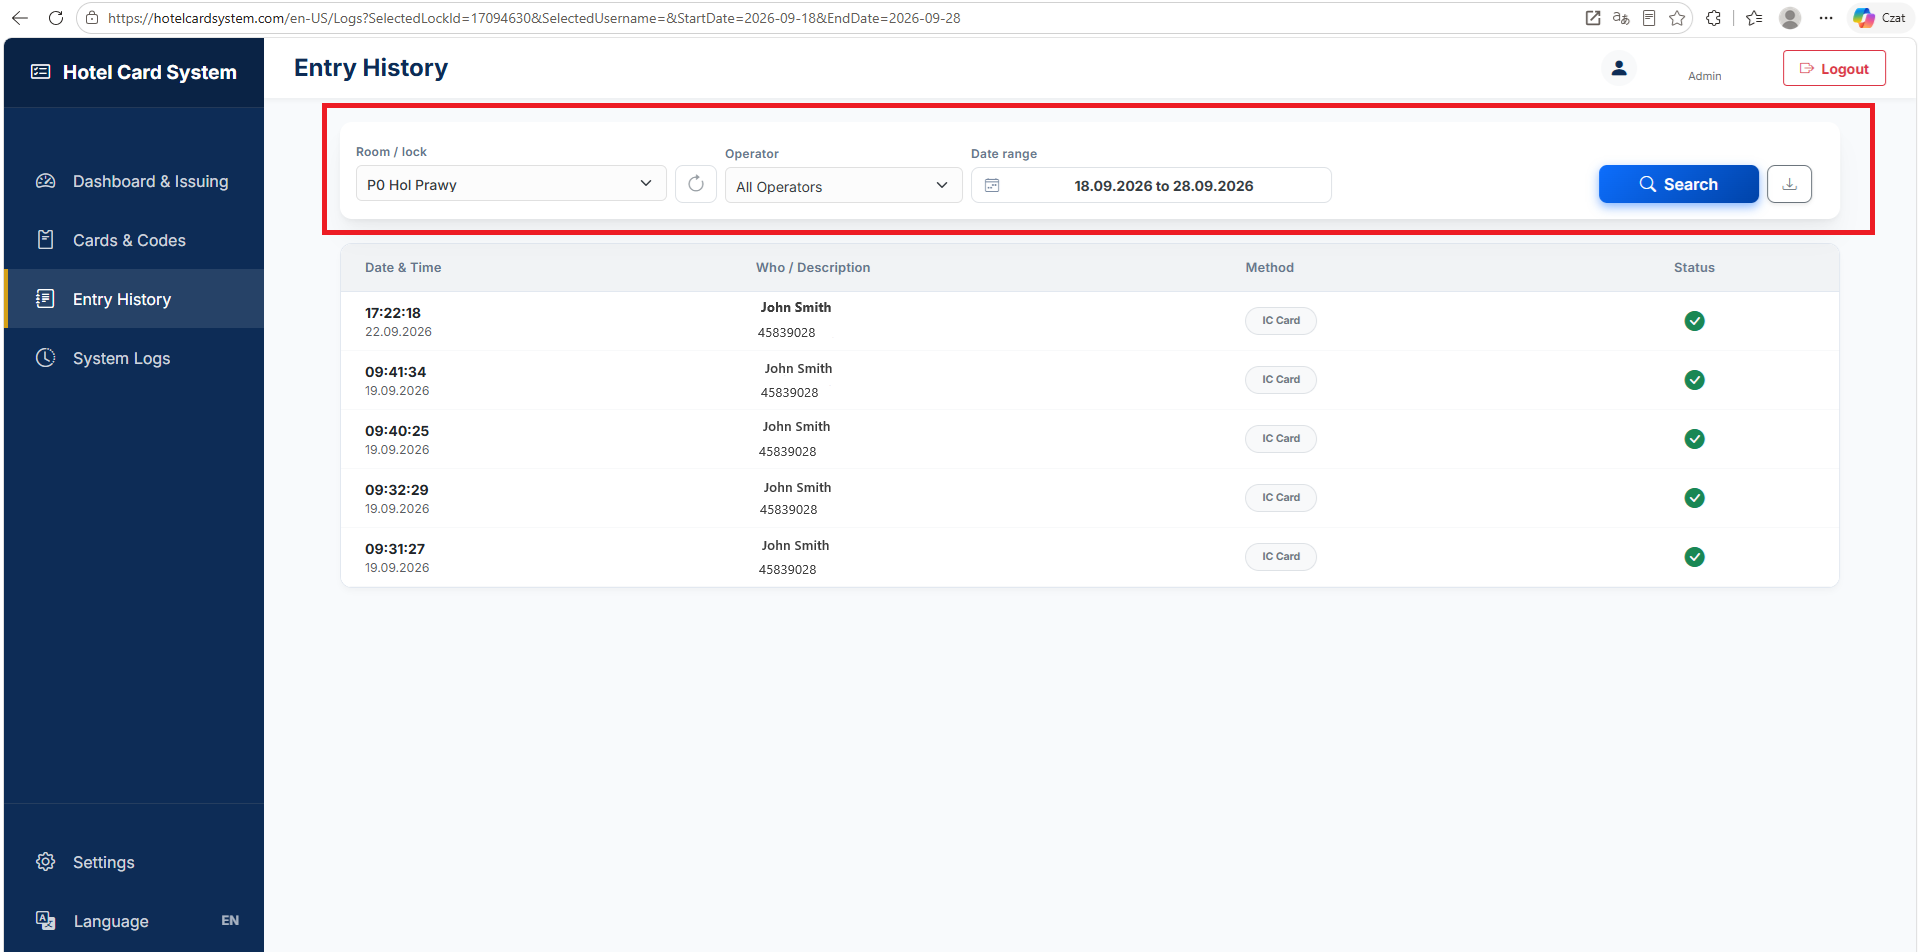
The Entry History module provides a complete record of all door interactions, allowing you to track exactly who accessed which lock and when.
Top Bar & Filtering Tools
Use the top navigation bar to quickly find the exact records you need:
- Room / lock: Filter the history by a specific physical lock (Note: this filters by individual locks, not entire zones).
- Sync Data (Circular Arrow): This button is essential when starting with HCS to pull historical data from TTLock. It is also used to retrieve missing records if a lock temporarily lost its Wi-Fi connection and the offline entries were not automatically saved to the database.
- Operator & Date Range: Narrow down the list by selecting a specific person who opened the door, or choose a custom time frame.
- Export (Download Icon): Click the down-arrow icon on the far right to download the currently filtered log as a PDF or Excel file.
Log Details
The main table clearly displays the exact Date & Time of entry, the Operator (Who/Description), the Method used (e.g., IC Card, Passcode), and the success Status (green checkmark for success, red cross for denied access).
Click the image to enlarge
System Logs
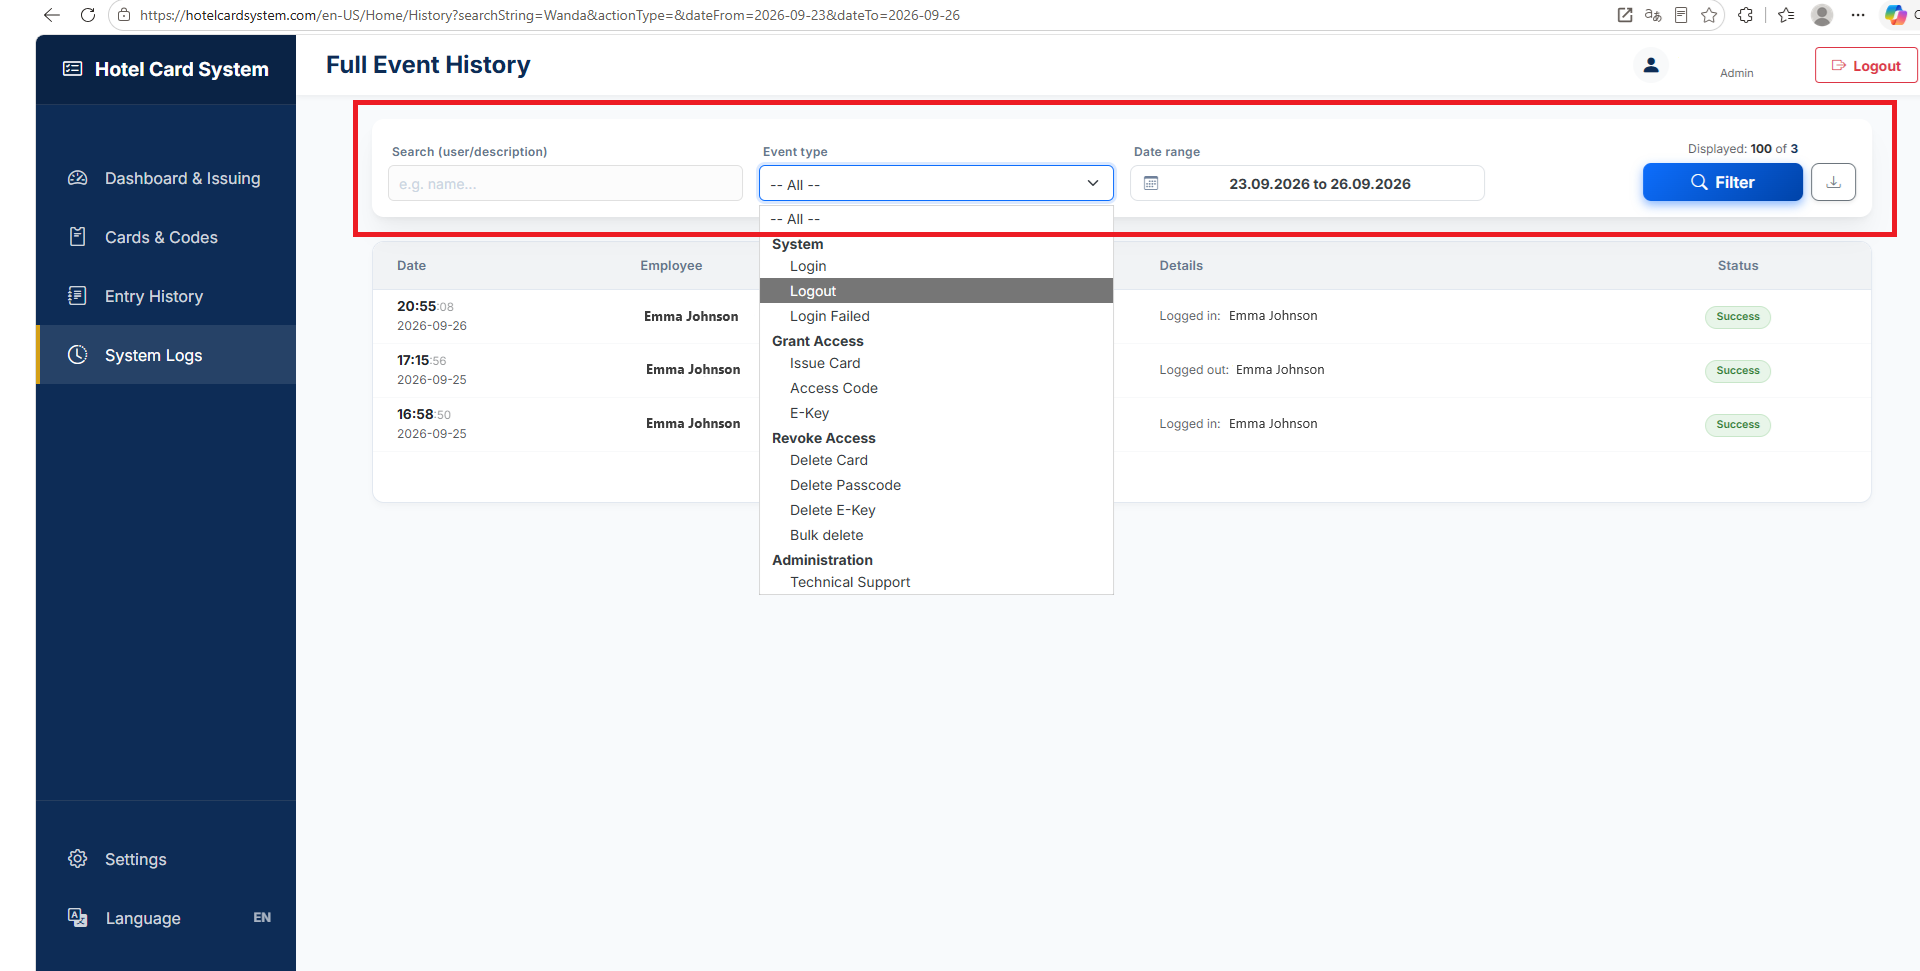
System Logs act as an administrative audit trail. They track all actions performed by staff within the HCS dashboard, ensuring full accountability.
Filtering & Search
Use the top bar to filter the event history:
- Search (user/description): Type an employee's name to see only the actions performed by that specific staff member.
- Event type: Filter the logs by the exact type of action performed, such as granting access (Issue Card, E-Key) or system events (Login, Logout).
- Date range: Select a specific timeframe for your audit.
- Filter Button: Note that the table does not refresh automatically. You must click the blue Filter button to apply your search criteria.
- Export (Download Icon): Click the down-arrow icon to download the currently filtered report as a PDF or Excel file.
Click the image to enlarge
System Settings
The Settings module allows you to configure core system behaviors, manage staff, and organize your hardware into logical groups.
a. Access Zones
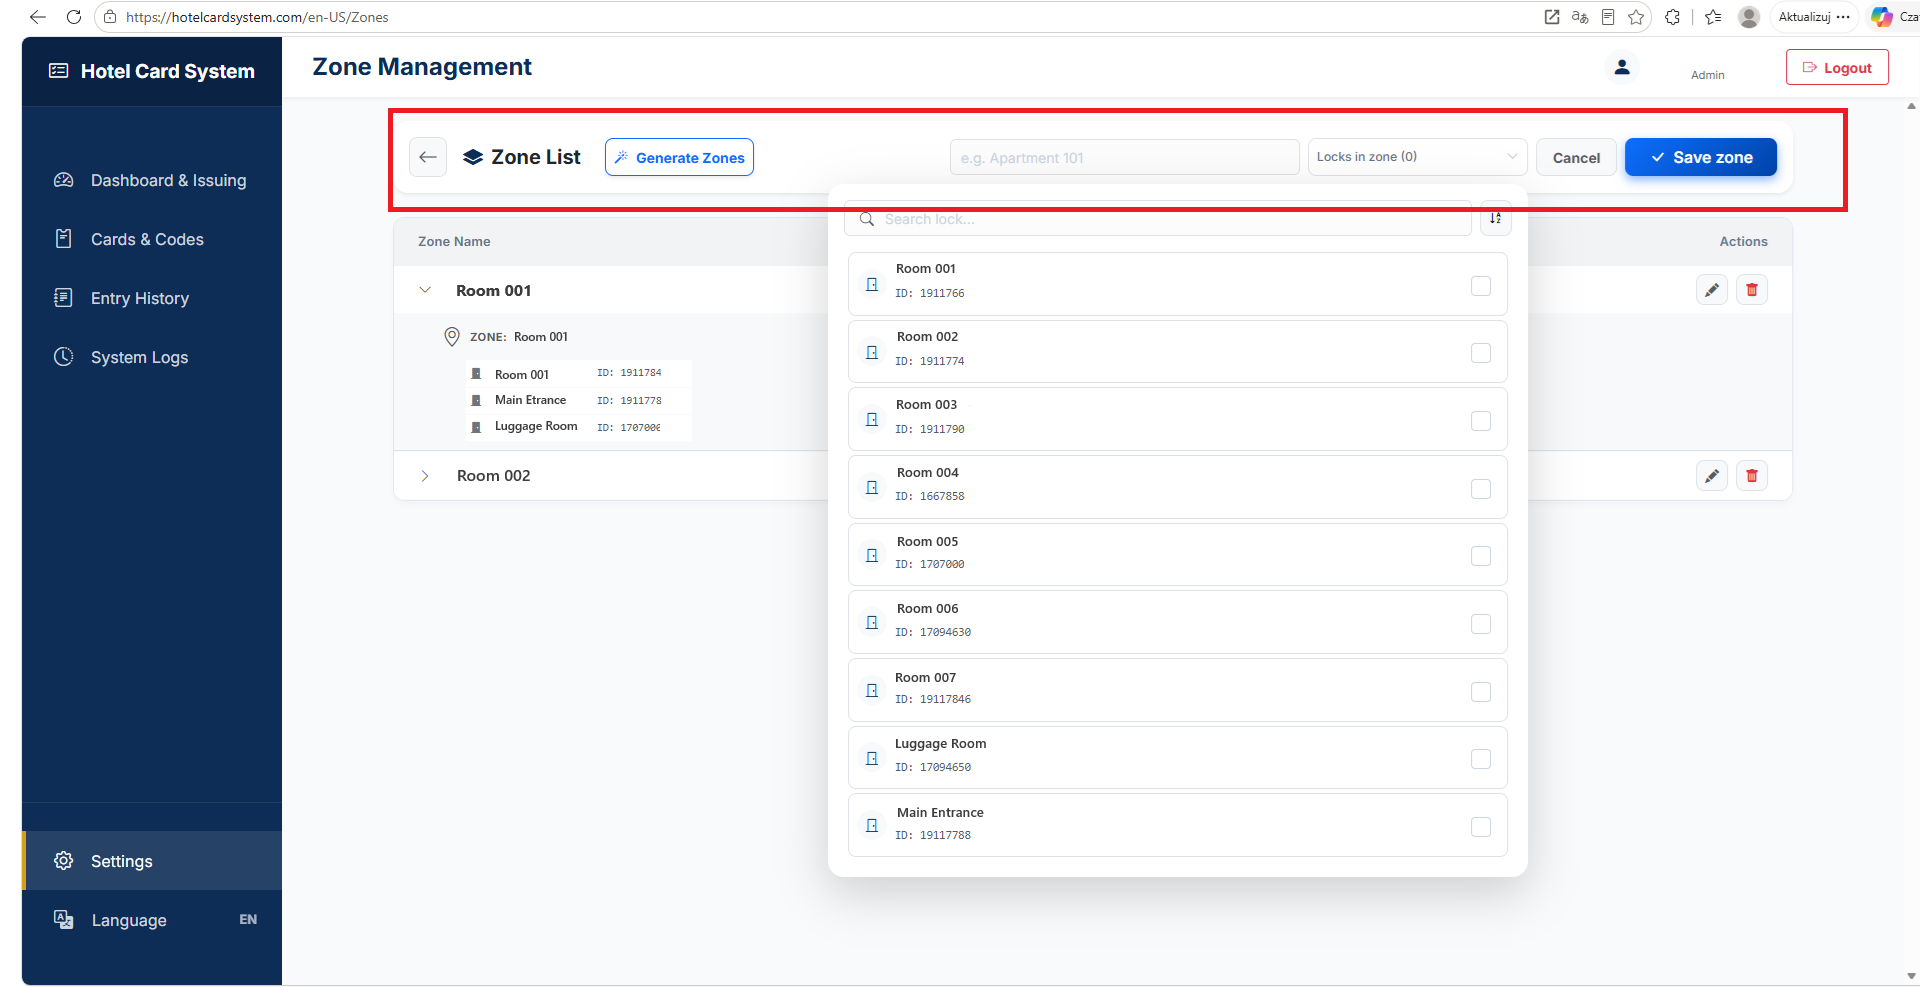
Zones allow you to group multiple locks together (e.g., "Apartment 101" might include both the Main Entrance and the Room Door). When issuing a card, you select a Zone rather than individual locks.
Creating Zones
- Generate Zones (Automatic): Click this button to automatically create a separate zone for every single lock in your system. The zone will inherit the lock's name. You can easily edit these later.
-
Manual Creation:
- Type the desired name in the text input (e.g., "VIP Suite").
- Click Locks in zone to open the dropdown and check the boxes next to all locks that belong to this group.
- Click Save zone to confirm, or Cancel to clear the form.
Managing Existing Zones
- Expand Details: Click on any row in the table to expand it and view the specific locks currently assigned to that zone.
- Edit (Pencil Icon): Loads the zone back into the top bar, allowing you to change its name or add/remove locks.
- Delete (Trash Icon): Permanently removes the zone (Note: this does not delete the physical locks from your system).
Click the image to enlarge
b. Extra Packages
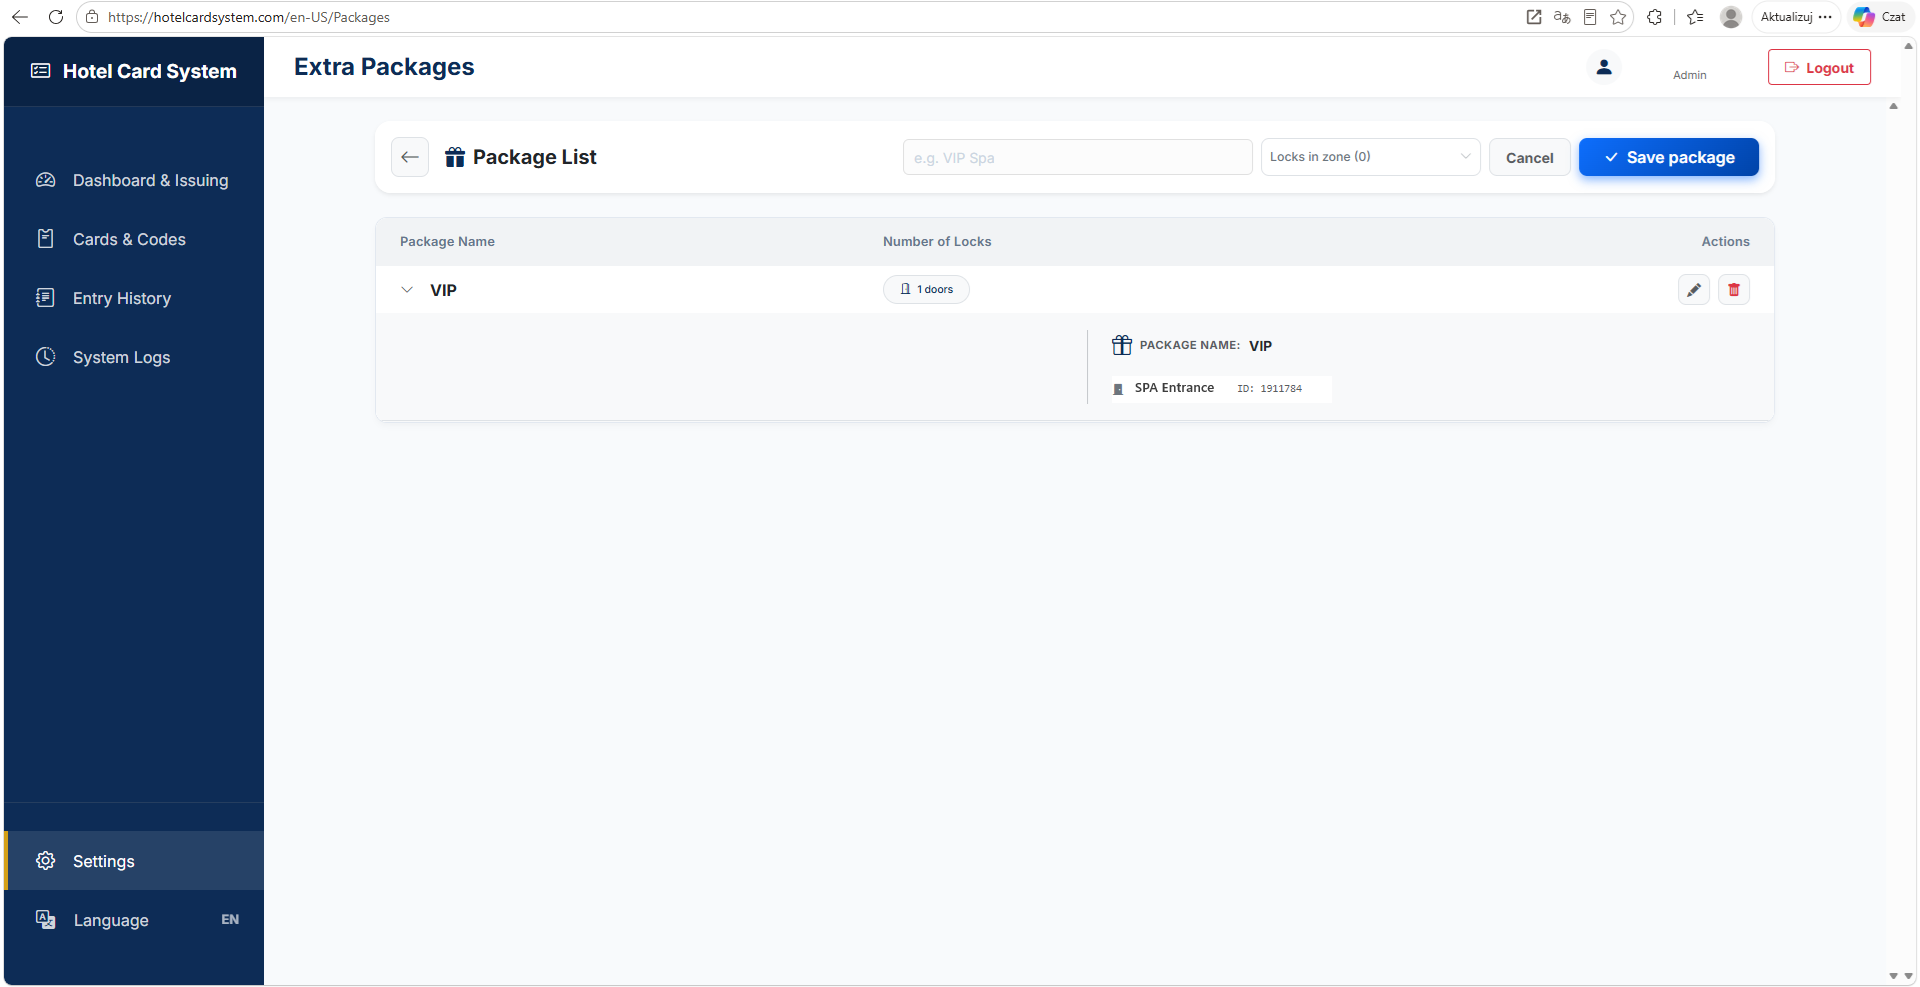
While Access Zones represent the primary location a guest booked (like their room), Extra Packages are optional add-ons that can be granted during the check-in process. This provides a flexible way to customize guest access to shared amenities or exclusive areas.
How Packages Work
- Common Examples: You can create packages for "SPA & Wellness", "Underground Parking", "VIP Lounge", or "Fitness Center".
- Issuing Process: When generating a card or passcode for a guest, you first select their main Room (Zone). Then, you simply check the boxes for any Extra Packages they purchased. The system automatically combines all necessary access rights into a single credential.
Creating and Managing Packages
The interface works exactly like Zone Management:
- Create: Type the package name (e.g., "VIP Spa"), open the Locks in zone dropdown to select the corresponding doors, and click Save package.
- Manage: Click on any package in the list to expand it and view the assigned doors. Use the pencil icon to edit or the trash icon to delete the package.
Click the image to enlarge
c. Employees
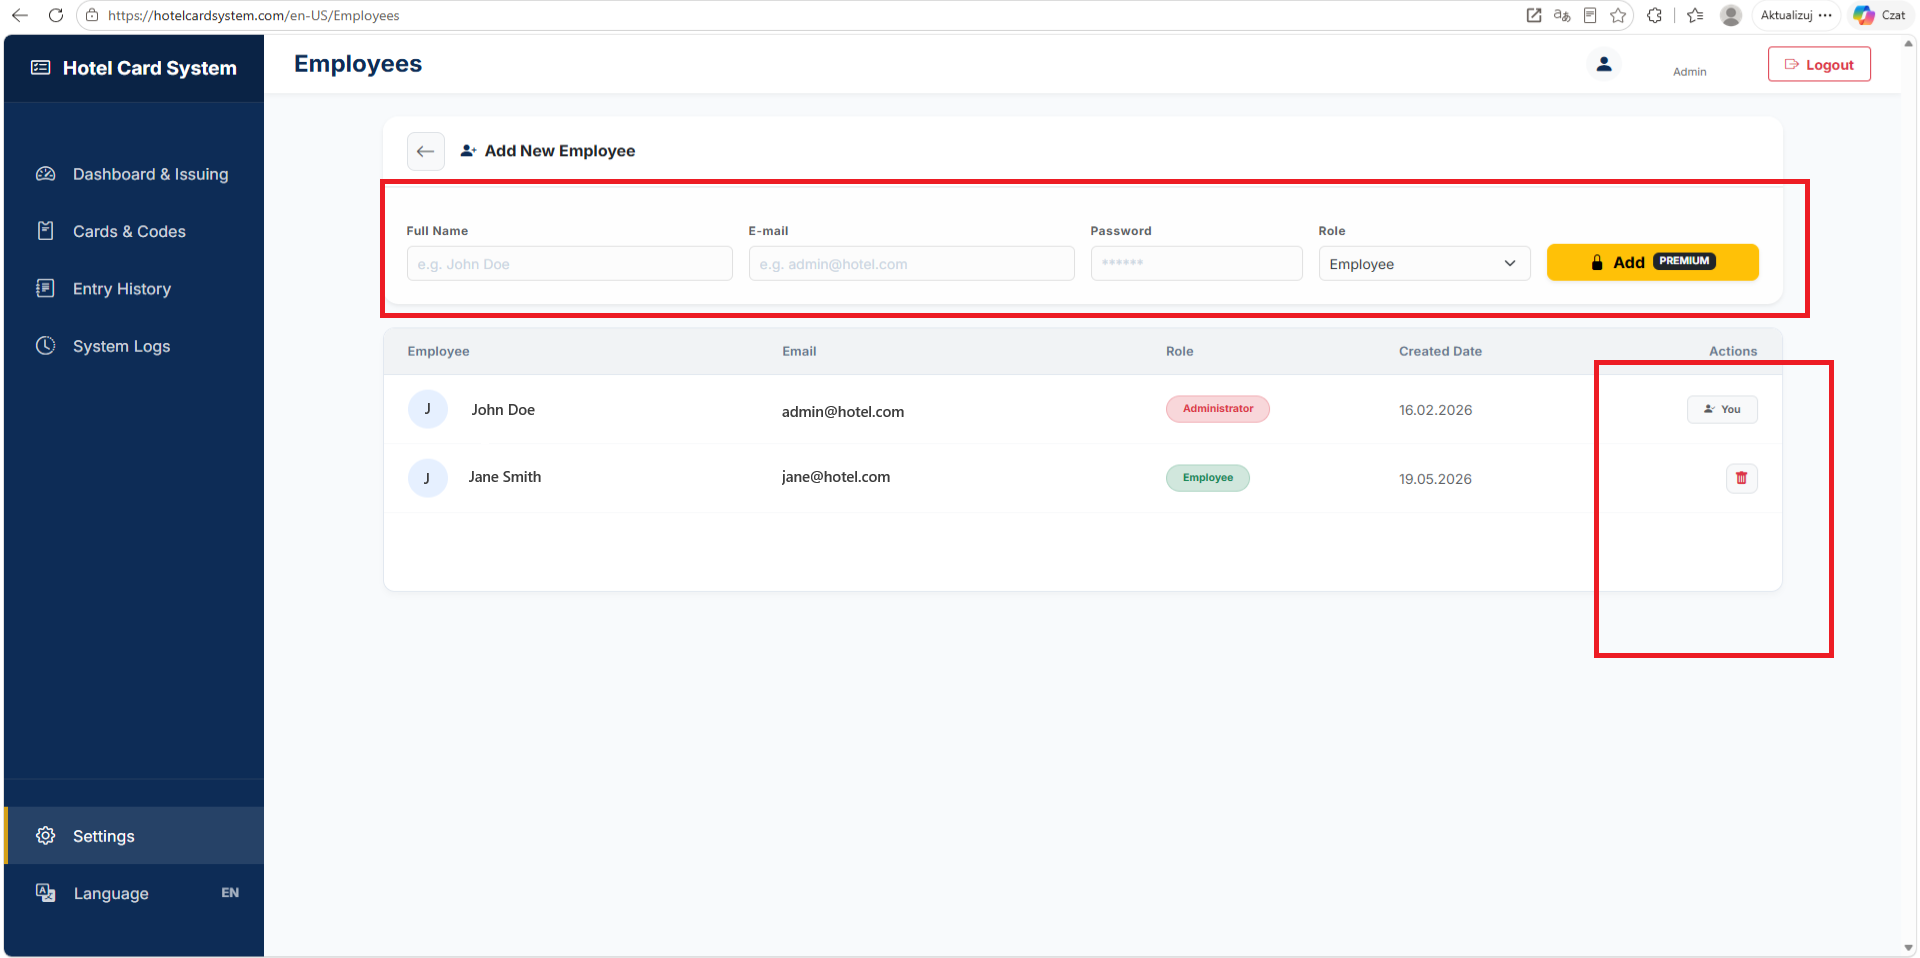
The Employees module allows you to manage staff access to the HCS dashboard. Every action performed in the system is tied to the account currently logged in and is permanently recorded in the System Logs.
Adding a New Employee
- Form Fields: Enter the staff member's Full Name, E-mail, and create an initial Password. The Full Name is exactly what will appear in your audit logs.
- Roles: Select Employee for standard front desk staff, or Administrator for owners/managers who need full access to system settings and billing.
Managing Accounts & Security
- Safe Deletion: As a fail-safe to prevent system lockouts, you cannot delete the Administrator account that is currently logged in.
- Changing Managers: To remove an existing Administrator, you must first create a new Administrator account, log out, log back in using the new account, and then delete the old one.
- Password Recovery: If a staff member forgets their password, they can click "Forgot Password" on the main login screen. A reset link will be sent to their registered email address.
Click the image to enlarge
d. TTLock Settings & Integration
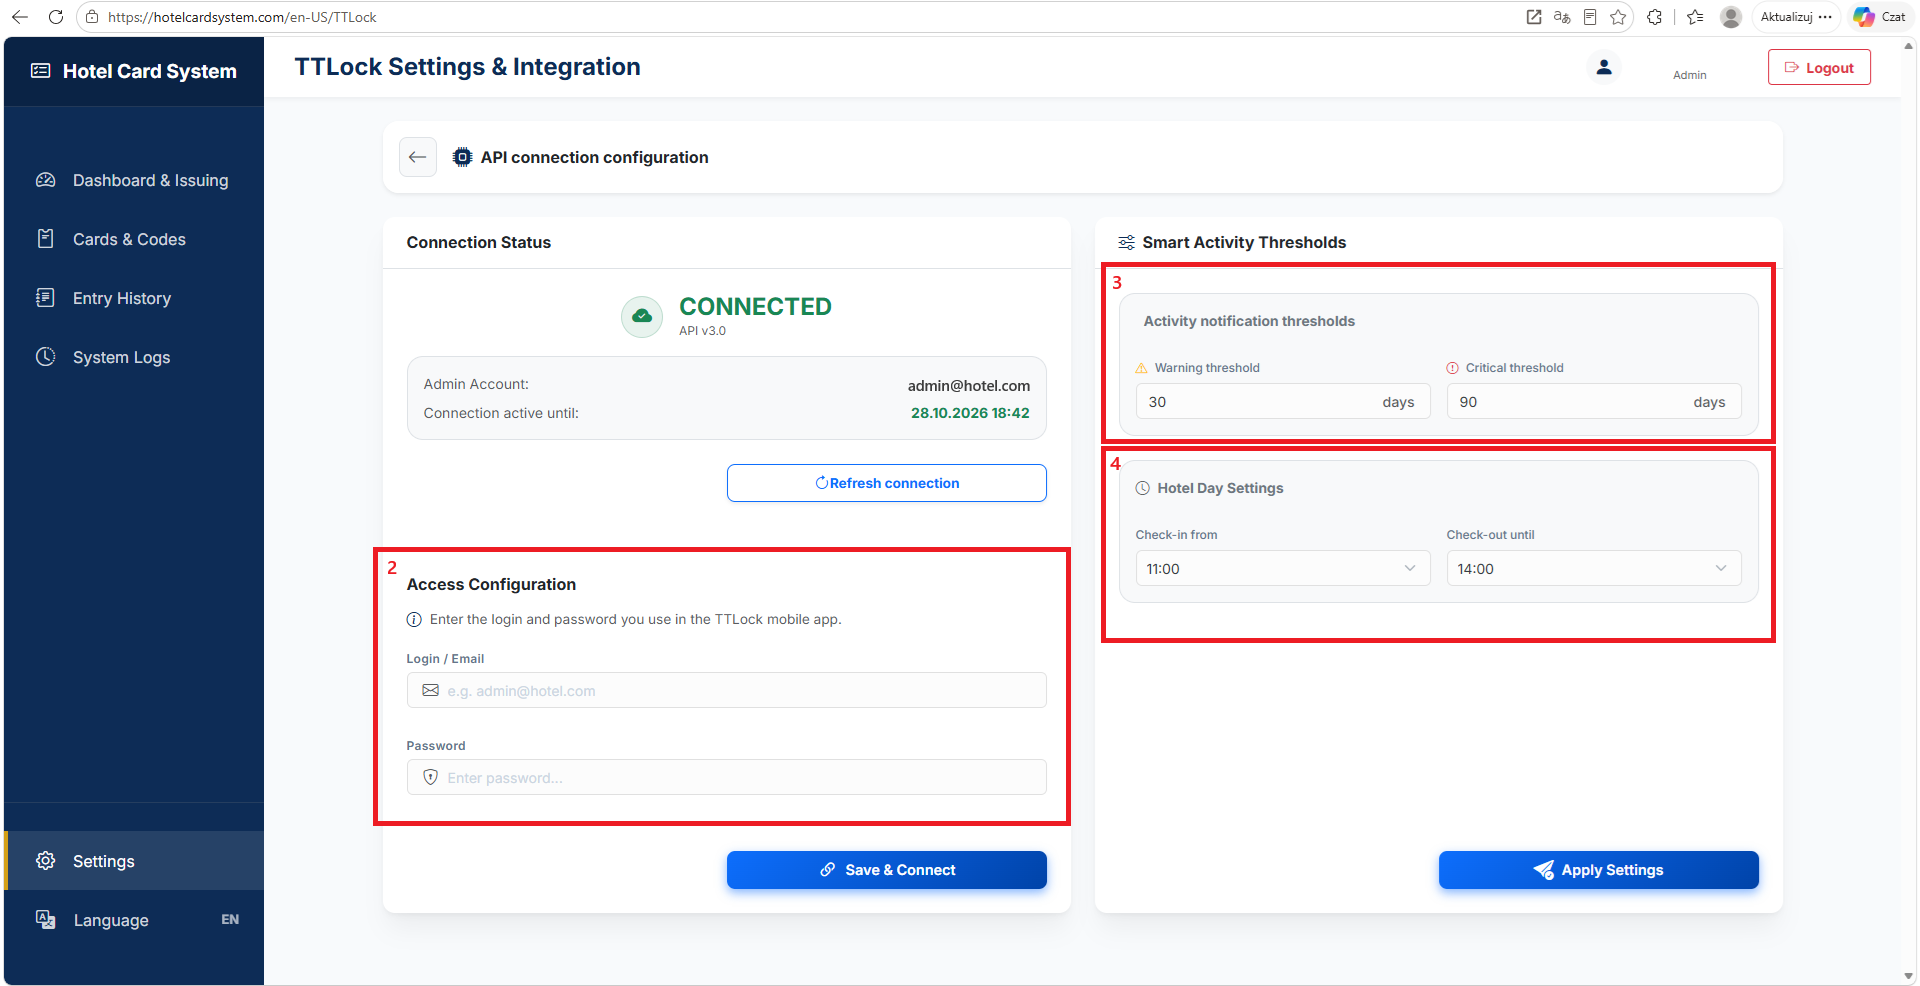
This module is the heart of HCS. Here you establish the secure connection between your physical locks and the web dashboard, as well as configure global time defaults.
API Connection Configuration (Left Panel)
- Connection Status & Refresh: Displays your current connection state (Connected/Disconnected). The Refresh connection button acts as a failsafe—use it to manually renew your API authorization token if the connection is ever interrupted.
- Access Configuration: Crucial step. You must enter the exact Email and Password that you use to log into your official TTLock mobile app. Click Save & Connect. Once authorized, HCS will automatically download your entire lock list in the background, allowing you to start building Access Zones.
System Settings (Right Panel)
- Smart Activity Thresholds: Define the number of inactive days required to trigger Warning or Critical alerts for Permanent credentials. This feature helps you identify lost staff cards. Read more in the Cards & Codes section.
- Hotel Day Settings: Set your property's standard check-in and check-out hours. When generating guest access, the system will automatically program the lock to activate and expire at these precise times on the selected dates.
Click the image to enlarge
e. Email Notifications
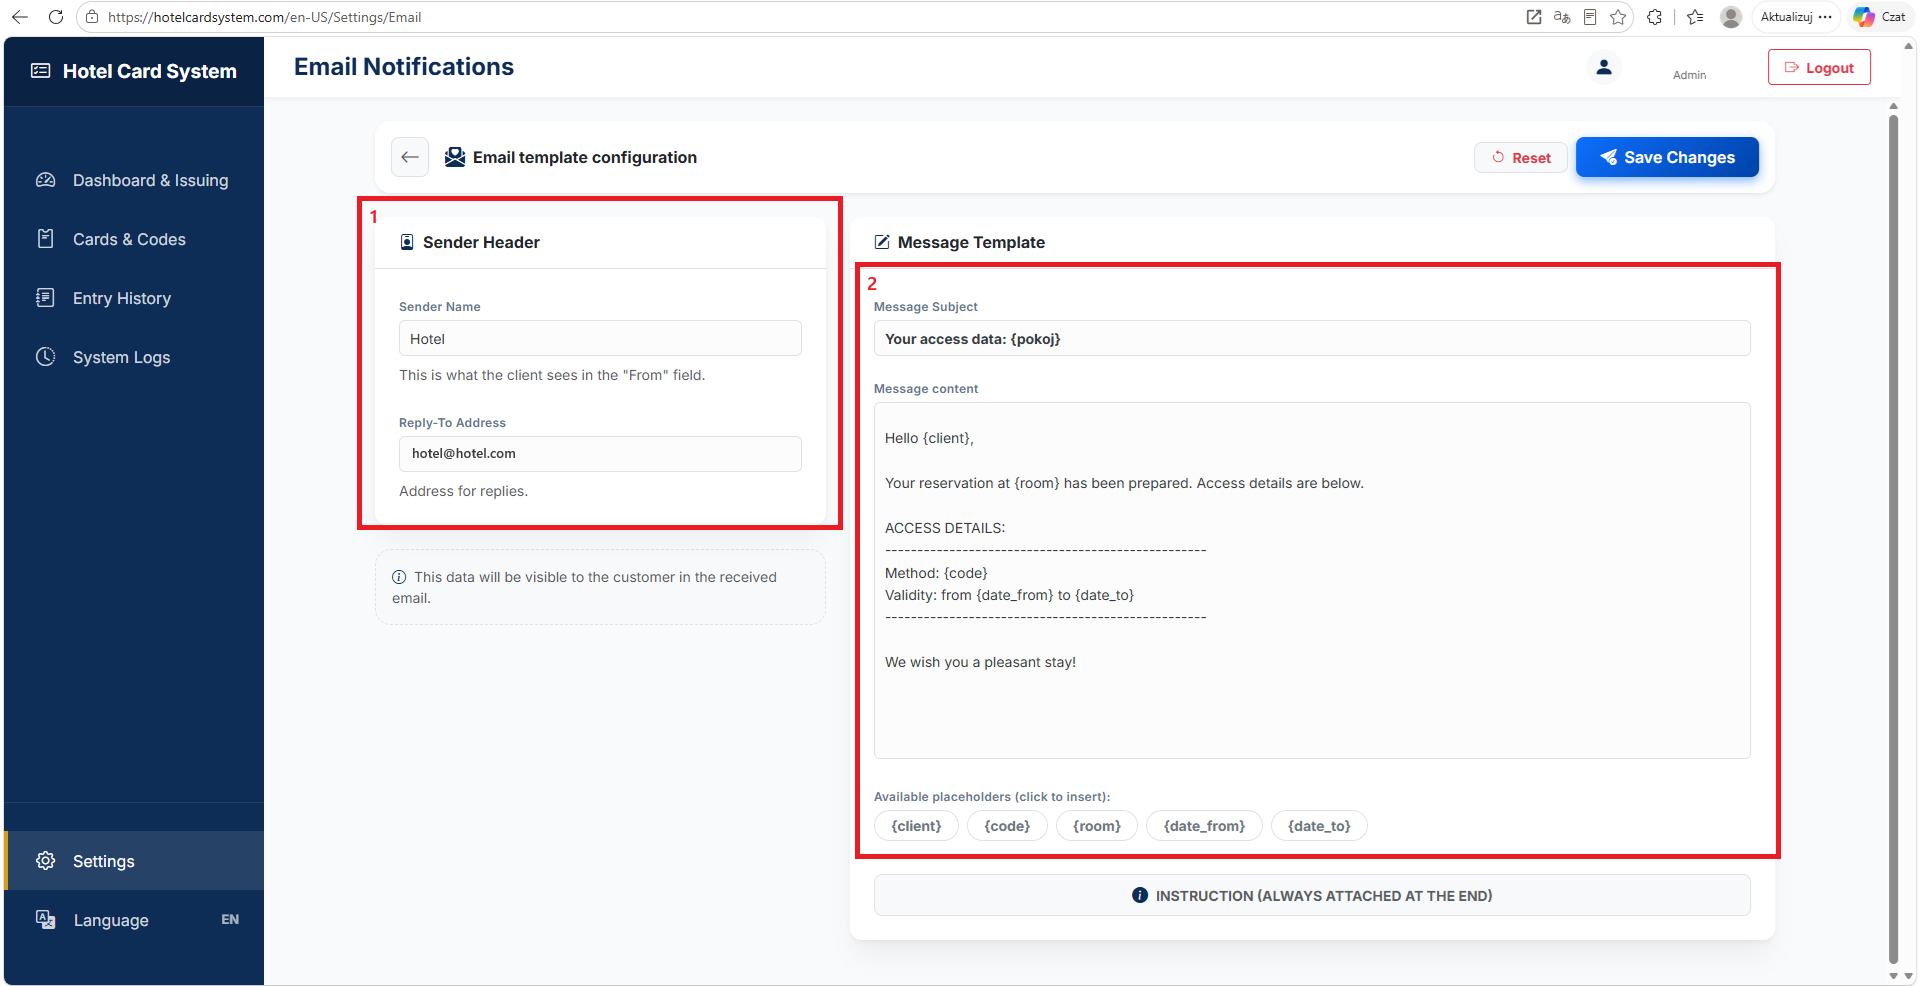
This section allows you to customize the automated messages sent to your guests when issuing access. Personalizing these emails ensures your guests recognize the sender and receive all necessary check-in details.
Configuration Steps
- Sender Header (Left Panel): Enter your property's name in the Sender Name field so guests know exactly who the message is from. Set the Reply-To Address to your reception's email, ensuring any guest replies go directly to your staff.
- Message Template (Right Panel): Customize the email subject and content. The default template automatically loads in the language currently selected in your HCS interface (EN, ES, or PL).
- Placeholders: Click the tags below the text box (e.g.,
{client},{room},{code}) to insert them into your message. The system will automatically swap these placeholders for real reservation data when sending the email. - Reset to Default: If you accidentally mix up the placeholders or delete crucial text, click the Reset button at the top to safely restore the original system message.
- Attached Instructions: Click the gray INSTRUCTION button at the bottom to preview the static technical guide. This step-by-step tutorial on how to use a PIN or E-Key is automatically appended to the end of every email, so you don't need to write it yourself.
Click the image to enlarge
Battery Service (Lock Management)
This module allows you to monitor and configure your hardware. Note: You can only access this page by clicking the Battery Service tile on the main Management Dashboard.
1. Main Hardware List & Top Bar
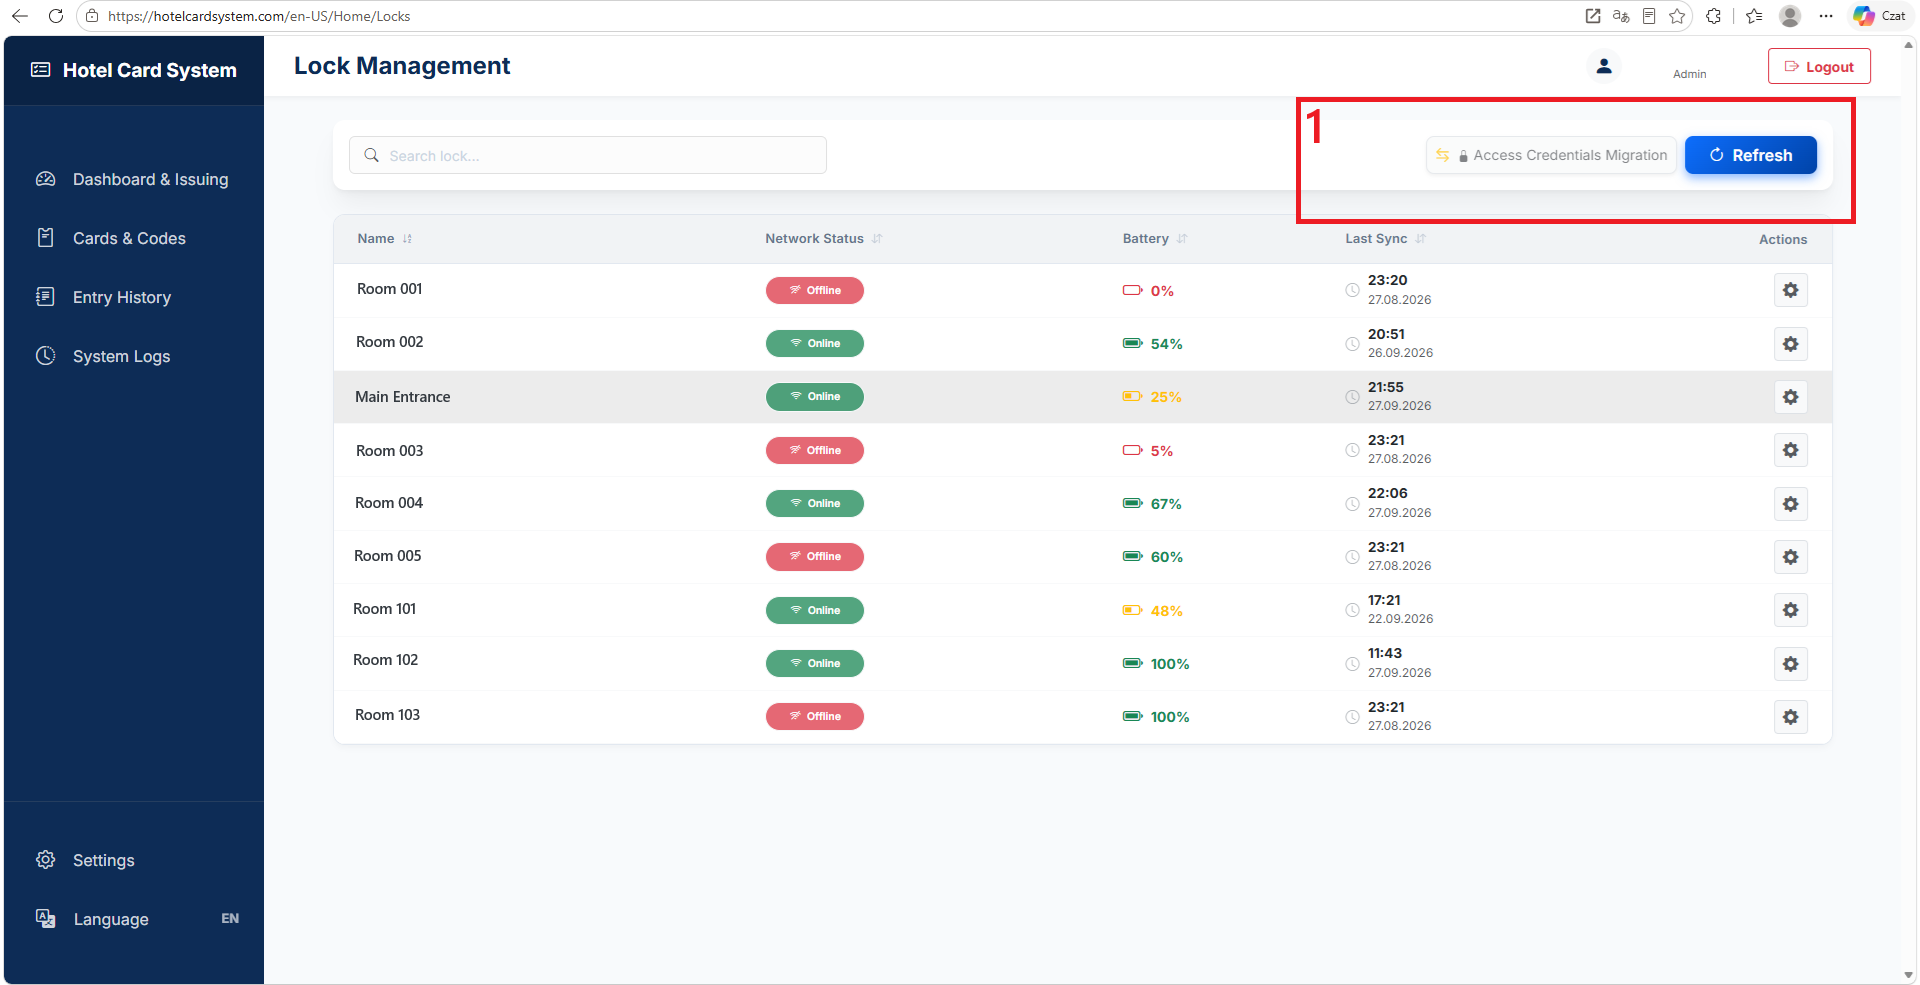
The main table provides diagnostic data for your locks. (Note: The system does not support remote unlocking).
- Network Status & Refresh: Shows if a lock is Online (connected via gateway) or Offline. Click the blue Refresh button at the top to pull the latest connection statuses directly from TTLock.
- Battery: Displays the power level. This percentage is updated automatically via a webhook every time a physical card is used to open the door.
- Access Credentials Migration: An advanced tool for service technicians. If a lock is physically replaced, this function transfers all active access credentials from the broken lock directly to the new one. It completely eliminates the need for guests to return to the reception to re-encode their physical cards.
2. Lock Settings (Gear Icon)
Clicking the gear icon in the Actions column opens a settings modal for individual lock configuration:
- Lock Name: Change the display name of the lock.
- Auto-lock: Set the exact time (in seconds) the lock remains open before automatically securing itself after a card is used.
- Volume: Adjust the loudness of the lock's built-in voice prompts.
3. Passage Mode
Passage Mode allows a door to remain unlocked during specific hours (e.g., office hours), supporting up to 5 separate time schedules.
- Activation Requirement: The door will not unlock automatically at the start time. A valid card must be used to open the door first. Once initiated during the scheduled window, the lock will remain open until the schedule ends.
Main Hardware List
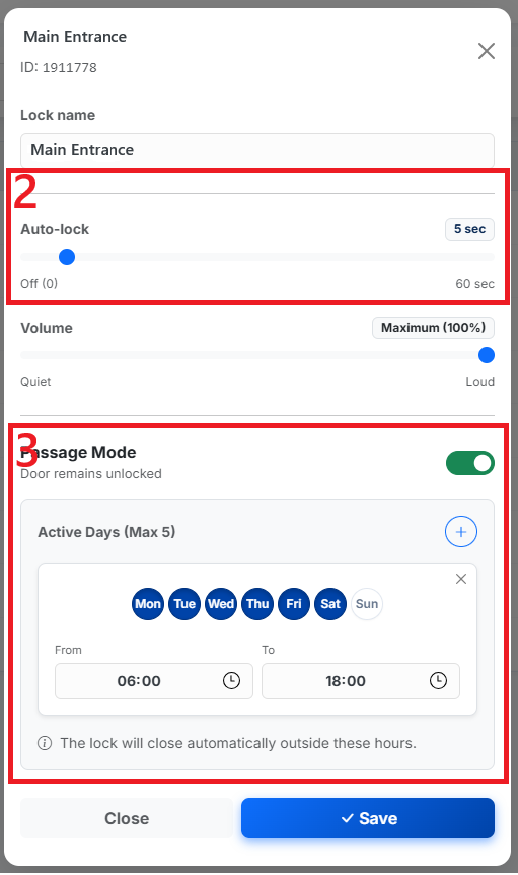
Lock Settings
Your Plan
The Your Plan module is where you manage your subscription, update invoicing details, and handle core account security.
a. Billing Details
This tab contains the essential company information required for generating your subscription invoices. Keeping this data up to date ensures your accounting records remain accurate.
Updating Your Information
- Billing Form: Carefully enter your Company Name, Tax ID / VAT Number, Country, Address, City, and Postal Code.
- Save: Once all fields are filled out correctly, click the blue Save Billing Details button at the bottom of the form to apply the changes.
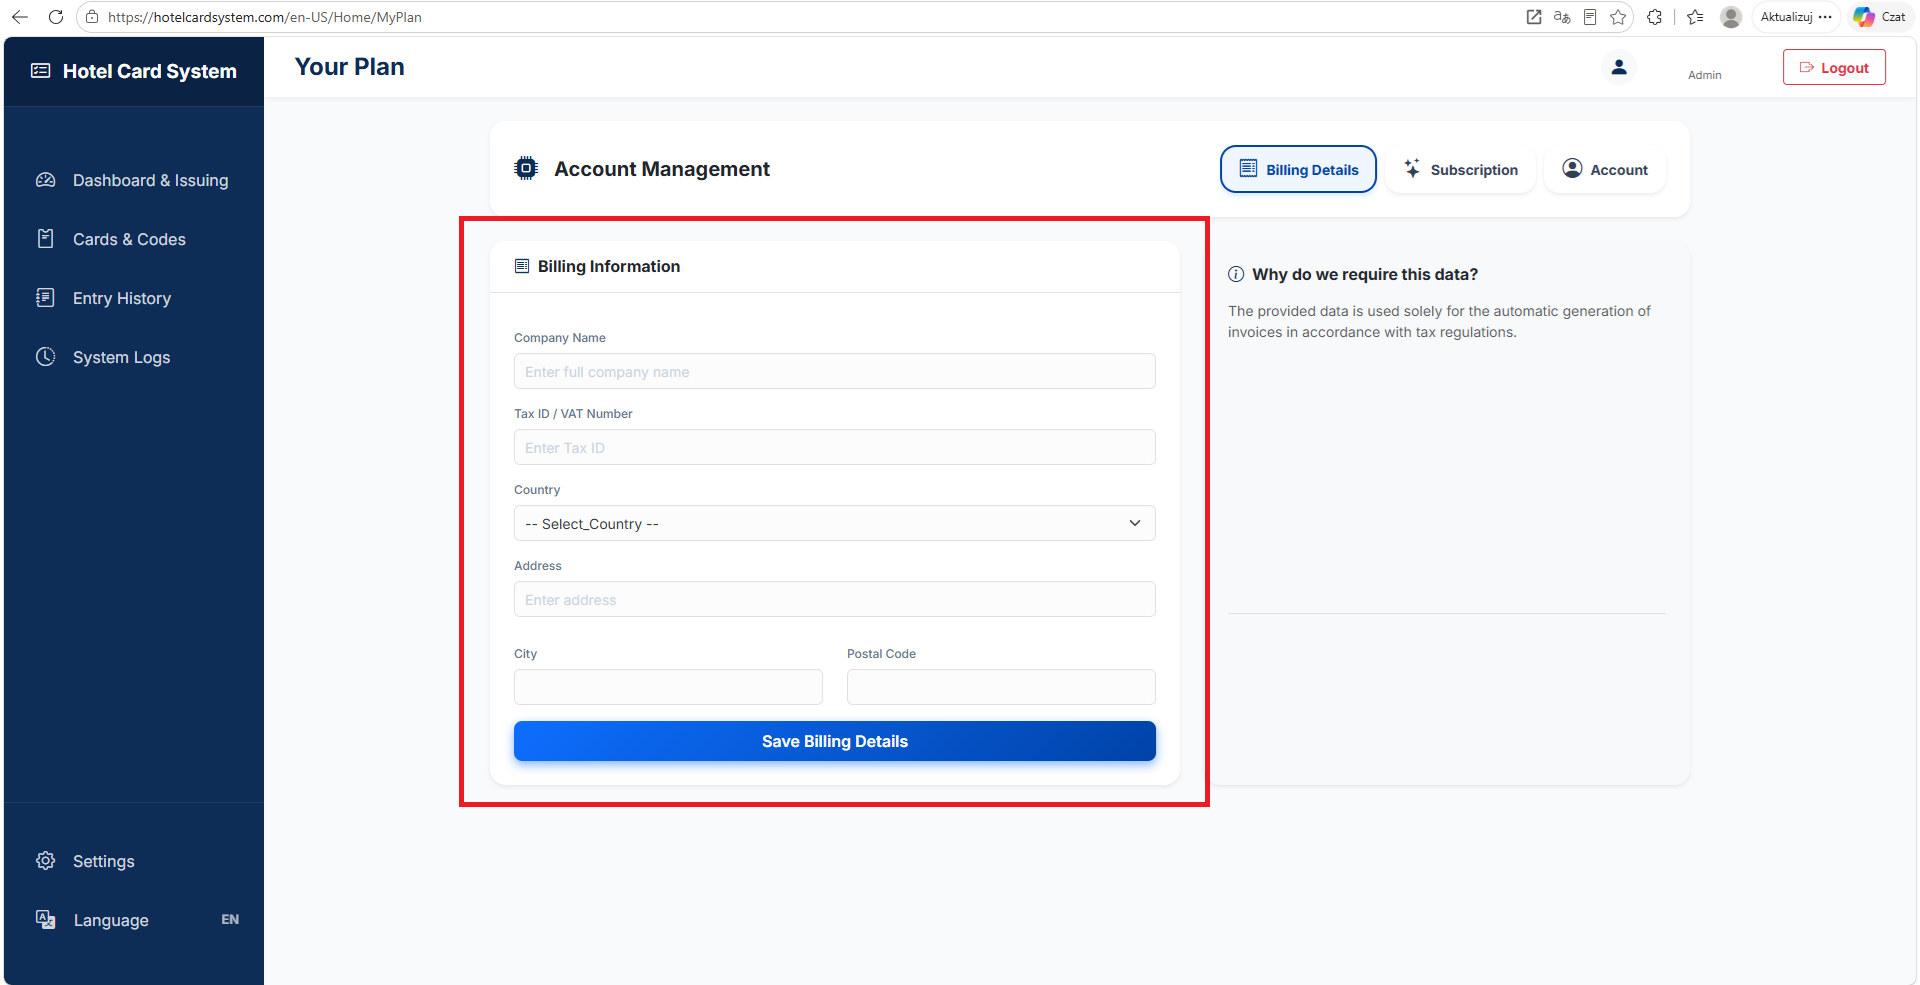
Click the image to enlarge
b. Subscription
This tab provides an overview of your current HCS plan, its validity, and quick access to your payment portal.
Understanding Your Dashboard
- Client Profile (Left Panel): Displays the main administrator's account details, including the founder's email and the original registration date.
- Subscription Status (Right Panel): Check your current plan level and exactly when it is scheduled to renew or expire. The status box will alert you if your features are active or suspended.
- Redeem Promo Code: If you have a valid promotional code, enter it in the text field and click ACTIVATE to apply it to your account.
Managing Payments
- Refresh Plan: Click this primary blue button if your subscription has expired or if you need to proceed to the secure checkout to renew your access.
- Manage Subscription and Invoices: This link securely redirects you to our payment provider (Paddle). There, you can update your credit card details, cancel your subscription, or download your past billing invoices.
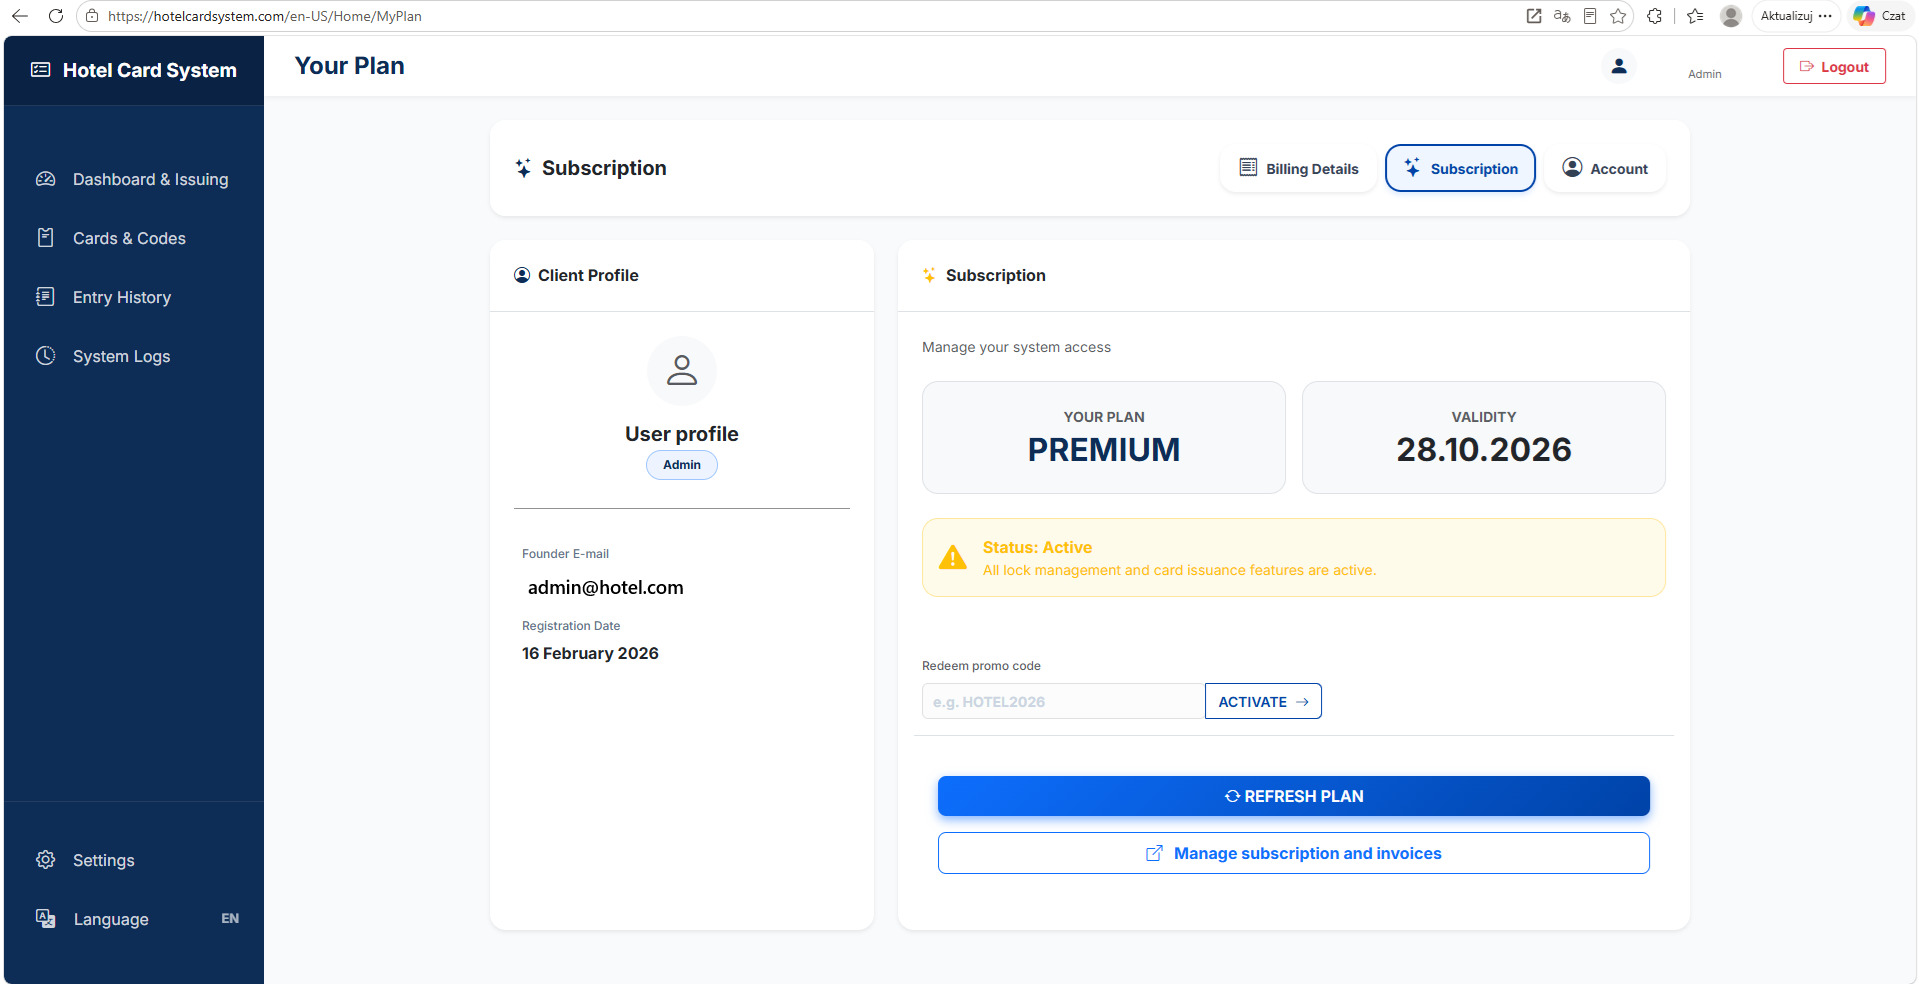
Click the image to enlarge
c. Account
The Account tab allows you to manage your personal details, system localization, and essential security settings.
Profile & Settings
- Your Data (Left Panel): These fields are optional and can be used to store your basic personal or property contact information.
- Account Settings (Top Right): Here you can update your primary login Email. More importantly, you must set the correct Time zone for your property to ensure that all access logs and automatic check-in/out times sync correctly with your local time.
Security
- Change Password: Administrators can update their account password here. Standard employee accounts do not have the authorization to access or modify this section.
- Permanently Delete Account: Clicking the trash bin icon at the bottom initiates the account closure process. It features a triple-confirmation safeguard to prevent accidental deletion. Note: If you delete your account, there is a 14-day grace period. During this time, you can contact our technical support to fully restore your account and locks before the data is permanently erased.
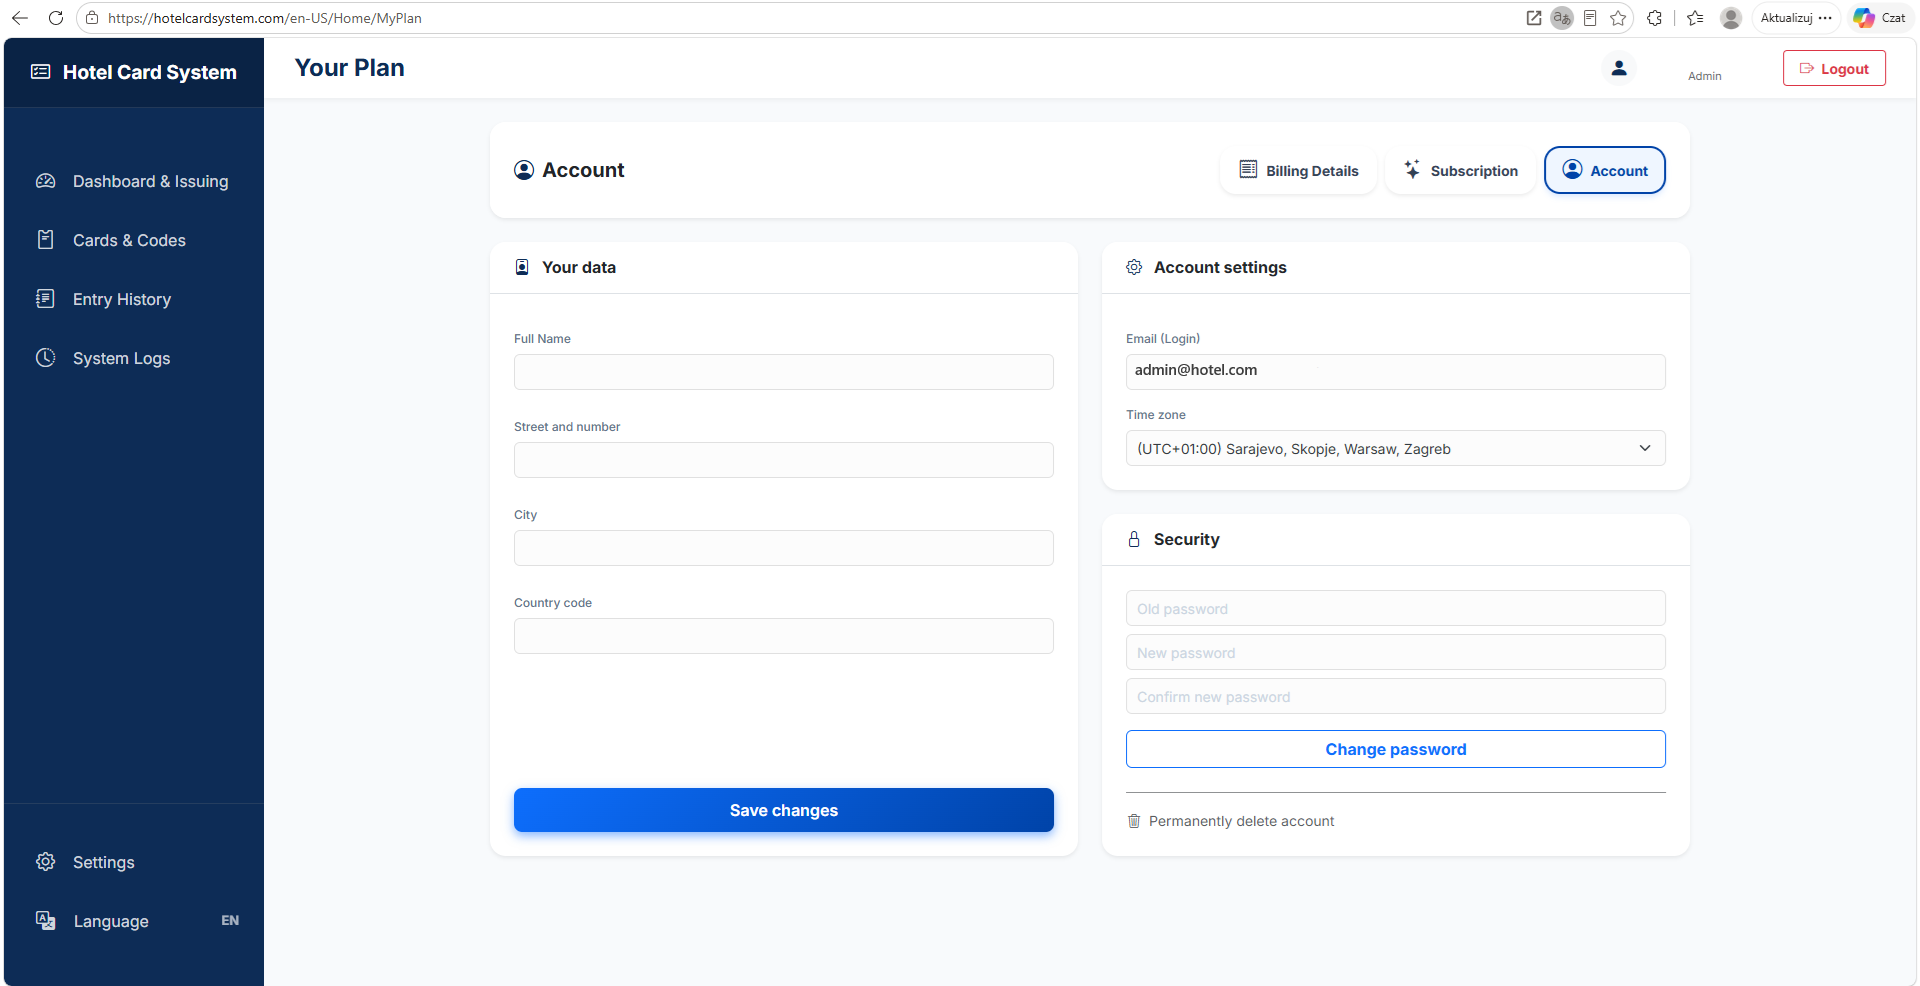
Click the image to enlarge
Ready to streamline your hotel management?
Head back to the homepage to learn more, or log in to manage your property.
Visit Homepage Log In to HCS